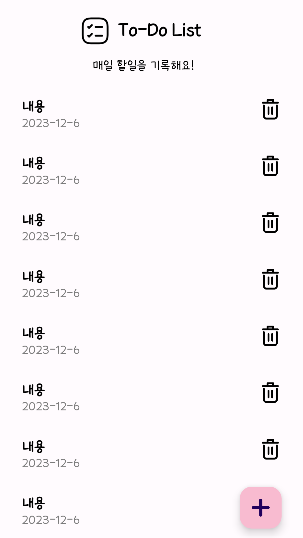
이번에는 할일을 작성하고 수정,삭제까지 가능한 메인화면을 만들어봤다
<?xml version="1.0" encoding="utf-8"?>
<androidx.constraintlayout.widget.ConstraintLayout xmlns:android="http://schemas.android.com/apk/res/android"
    xmlns:app="http://schemas.android.com/apk/res-auto"
    xmlns:tools="http://schemas.android.com/tools"
    android:layout_width="match_parent"
    android:layout_height="match_parent"
    android:layout_gravity="center"
    tools:context=".activity.MainActivity">


    <ImageView
        android:id="@+id/imageView"
        android:layout_width="40dp"
        android:layout_height="40dp"
        android:layout_marginEnd="10dp"
        app:layout_constraintBottom_toBottomOf="@+id/textView2"
        app:layout_constraintEnd_toStartOf="@+id/textView2"
        app:layout_constraintTop_toTopOf="@+id/textView2"
        app:srcCompat="@drawable/splashimg" />


    <TextView
        android:id="@+id/textView2"
        android:layout_width="wrap_content"
        android:layout_height="wrap_content"
        android:layout_marginTop="28dp"
        android:layout_marginEnd="140dp"
        android:fontFamily="@font/yeongdeok"
        android:text="To-Do List"
        android:textColor="@color/black"
        android:textSize="24sp"
        android:textStyle="bold"
        app:layout_constraintEnd_toEndOf="parent"
        app:layout_constraintTop_toTopOf="parent" />

    <TextView
        android:id="@+id/textView3"
        android:layout_width="wrap_content"
        android:layout_height="wrap_content"
        android:layout_marginStart="5dp"
        android:layout_marginTop="16dp"
        android:fontFamily="@font/yeongdeok"
        android:text="매일 할일을 기록해요!"
        android:textColor="@color/black"
        android:textSize="18sp"
        app:layout_constraintEnd_toEndOf="@+id/textView2"
        app:layout_constraintHorizontal_bias="0.56"
        app:layout_constraintStart_toStartOf="@+id/imageView"
        app:layout_constraintTop_toBottomOf="@+id/imageView" />

    <androidx.recyclerview.widget.RecyclerView
        android:id="@+id/recyclerview_todo"
        android:layout_width="0dp"
        android:layout_height="0dp"
        android:layout_marginStart="16dp"
        android:layout_marginTop="16dp"
        android:layout_marginEnd="16dp"
        android:layout_marginBottom="16dp"
        app:layoutManager="androidx.recyclerview.widget.LinearLayoutManager"
        tools:listitem="@layout/list_item_todo"
        app:layout_constraintBottom_toBottomOf="parent"
        app:layout_constraintEnd_toEndOf="parent"
        app:layout_constraintStart_toStartOf="parent"
        app:layout_constraintTop_toBottomOf="@+id/textView3" />

    <com.google.android.material.floatingactionbutton.FloatingActionButton
        android:id="@+id/btn_write"
        android:layout_width="wrap_content"
        android:layout_height="wrap_content"
        android:layout_marginEnd="32dp"
        android:layout_marginBottom="24dp"
        android:backgroundTint="#F8BBD0"
        android:clickable="true"
        android:elevation="10dp"
        app:layout_constraintBottom_toBottomOf="parent"
        app:layout_constraintEnd_toEndOf="parent"
        app:srcCompat="@drawable/img_write" />


</androidx.constraintlayout.widget.ConstraintLayout>
activity_main.xml
리사이클러뷰를 사용해서 일정을 작성하고 수정,삭제할수있도록 디자인했고,
FloatingActionButton을 눌러서 일정을 작성할수있도록 디자인 했다
package com.example.todolist.model

import androidx.room.Entity
import androidx.room.PrimaryKey


@Entity
class TodoInfo {
    //데이터를 집어넣음(각각의 요소를 집어넣음)
    //리사이클러뷰 아이템 하나에 들어갈 데이터
    var todoContent : String = ""   // 내용
    var todoDate : String = ""      // 날짜


    @PrimaryKey(autoGenerate = true)        // PrimaryKey 생성 (기본키)
    var id : Int = 0                        // id라는 변수는 Int값을 가지고, 초기값은 0
}
TodoInfo.kt
여기에는 리사이클러뷰에 들어갈 데이터들을 집어넣었다
내용,날짜 데이터가 들어갈 수 있는 모델을 만들었음
<?xml version="1.0" encoding="utf-8"?>
<LinearLayout
    xmlns:android="http://schemas.android.com/apk/res/android"
    android:layout_width="match_parent"
    android:layout_height="wrap_content"
    android:layout_margin="16dp"
    android:orientation="horizontal">


    <LinearLayout
        android:layout_width="match_parent"
        android:layout_height="wrap_content"
        android:layout_weight="1"
        android:orientation="vertical">


    <TextView
        android:id="@+id/tv_content"
        android:layout_width="wrap_content"
        android:layout_height="wrap_content"
        android:fontFamily="@font/yeongdeok"
        android:textSize="20sp"
        android:textStyle="bold"
        android:textColor="@color/black"
        android:text="내용"/>

    <TextView
        android:id="@+id/tv_date"
        android:layout_width="wrap_content"
        android:layout_height="wrap_content"
        android:fontFamily="@font/yeongdeok"
        android:textSize="16sp"
        android:textColor="#7C7C7C"
        android:text="2023-12-6"/>


    </LinearLayout>

    <ImageView
        android:id="@+id/btn_delete"
        android:layout_width="30dp"
        android:layout_height="30dp"
        android:src="@drawable/img_delete"/>


</LinearLayout>
list_item_todo.xml
TodoInfo.kt에 만들어놓은 데이터들을 기반으로 리사이클러뷰 아이템 화면을 디자인했다.

<?xml version="1.0" encoding="utf-8"?>
<LinearLayout xmlns:android="http://schemas.android.com/apk/res/android"
    android:layout_width="match_parent"
    android:layout_height="wrap_content"
    android:layout_margin="16dp"
    xmlns:app="http://schemas.android.com/apk/res-auto"
    android:orientation="vertical">


    <com.google.android.material.textfield.TextInputLayout
        android:layout_width="match_parent"
        android:layout_height="wrap_content"
        app:counterEnabled = "true"
        app:counterMaxLength="50">

        <com.google.android.material.textfield.TextInputEditText
            android:id="@+id/et_memo"
            android:layout_width="match_parent"
            android:layout_height="wrap_content"
            android:fontFamily="@font/yeongdeok"
            android:layout_margin="16dp"
            android:singleLine="true"
            android:maxLines="1"
            android:maxLength="50"
            android:hint="할일을 기록해보세요!"/>


    </com.google.android.material.textfield.TextInputLayout>


</LinearLayout>
dialog_edit.xml
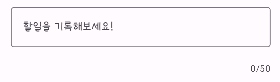
FloatingActionButton을 눌렀을때 나오는 작성버튼과 내용을 클릭하면 나오는 수정버튼의 Dialog를 표현하기위해 디자인화면을 만들었다
근데 지금까지 한건 실제 데이터가 아니라 UI상으로만 보이게 해놓은것이기 때문에 recyclerview adapter를 만들어서 동작구현을 해야한다
//리사이클러뷰 어뎁터를 상속 받아야지 데이터연동을 할수있음

class TodoAdapter : RecyclerView.Adapter<TodoAdapter.TodoViewHolder>() {

    private var lstTodo : ArrayList<TodoInfo> = ArrayList()   //TodoInfo라는 데이터를 가진 배열리스트형태를 lasTodo변수에 담겠다
    private lateinit var roomDatabase: TodoDatabase


//    // init = 클래스가 생설될때 가징먼저 호출되는것
//    init {
//        // 샘플 리스트 아이템 인스턴스 생성(임의로 만든거) (room DB연동 후에는 삭제함)
//        val todoItem = TodoInfo()
//        todoItem.todoContent = "To Do List앱 만들기!"
//        todoItem.todoDate = "2023-06-01"
//        lstTodo.add(todoItem)
//
//        // 샘플 리스트 아이템 인스턴스 생성
//        val todoItem2 = TodoInfo()
//        todoItem2.todoContent = "블로그 작성하기"
//        todoItem2.todoDate = "2023-06-01"
//        lstTodo.add(todoItem2)
//
//        // 샘플 리스트 아이템 인스턴스 생성
//        val todoItem3 = TodoInfo()
//        todoItem3.todoContent = "기말 공부하기!"
//        todoItem3.todoDate = "2023-06-01"
//        lstTodo.add(todoItem3)
//
//    }


    fun addListItem(todoItem: TodoInfo) {
        // 4,0,1,2,3
        lstTodo.add(0, todoItem)    //최신꺼가 젤 처음나오게 하려면 0추가 (아이템 추가될때마다 최신순서로 배치)
    }


    inner class TodoViewHolder(private val binding: ListItemTodoBinding) : RecyclerView.ViewHolder(binding.root) { // binding.root에 있는 binding은 앞쪽에 선언했던 변수임
    // viewHolder = 각 리스트 아이템들을 보관하는 객체
        fun bind(todoItem : TodoInfo) {
            // 리스트 뷰 데이터를 UI에 연동
            binding.tvContent.setText(todoItem.todoContent)
            binding.tvDate.setText(todoItem.todoDate)


            // 삭제 버튼 클릭했을때
            binding.btnDelete.setOnClickListener {
                // 삭제 버튼 클릭 시 내부 로직 구현

                //다이얼로그 띄우기
                AlertDialog.Builder(binding.root.context)
//                    .setTitle("삭제")
                    .setMessage("정말 삭제하시겠습니까?")
                    .setPositiveButton("네",DialogInterface.OnClickListener { dialog, which ->

                        CoroutineScope(Dispatchers.IO).launch {
                            // db에도 적용해주기
                            val innerLstTodo = roomDatabase.todoDao().getAllReadData()     //현재 db에 저장되어있는 데이터를 모두 가지고와서 arraylist형태로 만듬
                            for (item in innerLstTodo) {
                                if (item.todoContent == todoItem.todoContent && item.todoDate == todoItem.todoDate){
                                    // database item 삭제
                                    roomDatabase.todoDao().deleteTodoDate(item)
                                }
                            }

                            // ui 삭제
                            lstTodo.remove(todoItem)    //lstTodo 배열에 담겨있는 todoItem 데이터들이 삭제
                            (binding.root.context as Activity).runOnUiThread {
                                notifyDataSetChanged()
                                Toast.makeText(binding.root.context,"삭제되었습니다", Toast.LENGTH_SHORT).show()
                            }
                        }

                    })

                    .setNegativeButton("아니오",DialogInterface.OnClickListener { dialog, which ->

                    })
                    .show()
            }


        // 리스트 수정
        binding.root.setOnClickListener {     // binding.root는 list_item_todo.xml에 있는 아이템을 나타냄
            val bindingDialog = DialogEditBinding.inflate(LayoutInflater.from(binding.root.context), binding.root, false)
//            // 기존에 작성한 데이터 보여주기
//            bindingDialog.etMemo.setText(todoItem.todoContent)

            AlertDialog.Builder(binding.root.context)
                .setTitle("수정하기")                 //팝업제목
                .setView(bindingDialog.root)        //bindingDialog를 넣는것
                .setPositiveButton("수정완료", DialogInterface.OnClickListener { dialog, which ->
                    CoroutineScope(Dispatchers.IO).launch {
                        // db에도 적용해주기
                        val innerLstTodo = roomDatabase.todoDao().getAllReadData()     //현재 db에 저장되어있는 데이터를 모두 가지고와서 arraylist형태로 만듬
                        for (item in innerLstTodo) {
                            if (item.todoContent == todoItem.todoContent && item.todoDate == todoItem.todoDate){
                                // database item 수정
                                item.todoContent =  bindingDialog.etMemo.text.toString()
                                item.todoDate = SimpleDateFormat("yyyy-MM-dd").format(Date())
                                roomDatabase.todoDao().updateTodoDate(item)
                            }
                        }

                        // 작성완료버튼 눌렀을때 동작
                        // ui 수정
                        todoItem.todoContent =  bindingDialog.etMemo.text.toString()                // bindingDialog.etMemo.text.toString() 를 사용해서 사용자가 입력한 값으로 가져오기
                        todoItem.todoDate = SimpleDateFormat("yyyy-MM-dd").format(Date())    //최신의 date값 넣어줌 (몇분몇초인지 HH:mm:ss)

                        // 리스트 수정 (array list 수정)
                        lstTodo.set(adapterPosition, todoItem)

                        (binding.root.context as Activity).runOnUiThread {
                            notifyDataSetChanged()
                        }
                    }

                })
                .setNegativeButton("취소", DialogInterface.OnClickListener { dialog, which ->
                    //취소버튼 눌렀을때 동작
                })
                .show() //마지막에 이걸 적어줘야 정상적으로 작동
        }

        }

    }


    override fun onCreateViewHolder(parent: ViewGroup, viewType: Int): TodoAdapter.TodoViewHolder {
        // viewHolder가 만들어질때
        // 각 리스트 아이템이 1개씩 구성될때마다 이 오버라이드 메소드가 호출됨
        val binding = ListItemTodoBinding.inflate(LayoutInflater.from(parent.context), parent, false)

        // roomDatabase 초기화
        roomDatabase = TodoDatabase.getInstance(binding.root.context)!!

        return TodoViewHolder(binding)
    }

    override fun onBindViewHolder(holder: TodoAdapter.TodoViewHolder, position: Int) {
        // viewHolder가 연결될때(바인딩될때)
        holder.bind(lstTodo[position])
    }

    override fun getItemCount(): Int {
        // 리스트 총 개수
        return lstTodo.size
    }

}
TodoAdapter.kt
여기서 내부 DB인 room databse까지 연결해주었다. room database를 연결해주지 않으면 앱을 나갔다들어왔을때 여태까지 한 결과가 반영되지않는다. 따라서 추가,수정,삭제부분에 database를 연결해주었다
room database는 내부데이터라서 안드로이드 스튜디오 내부에서 쓰일수있어서 간편하게 쓸수있는 database이다
내용을 누르면 Dialog가 나와서 수정할수있고, 삭제 이미지를 누르면 삭제가 되도록 구현했다
class MainActivity : AppCompatActivity() {
    private lateinit var binding: ActivityMainBinding   //binding 준비
    private lateinit var todoAdapter: TodoAdapter       //adapter 준비
    private lateinit var roomDatabase: TodoDatabase


    override fun onCreate(savedInstanceState: Bundle?) {
        super.onCreate(savedInstanceState)
        binding = ActivityMainBinding.inflate((layoutInflater)) //실제 activity_main.xml에 있는 리사이클러뷰를 연동
        setContentView(binding.root)


        // 어뎁터 생성
        todoAdapter = TodoAdapter()

        // 리사이클러뷰에 어뎁터 세팅
        binding.recyclerviewTodo.adapter = todoAdapter      //어뎁터를 이미 만들어놨기 때문에 연결바로가능

        // roomDatabase 초기화
        roomDatabase = TodoDatabase.getInstance(applicationContext)!!

        // 전체 데이터 load(가져옴) (코루틴 사용 - 비동기처리[순서상관없이 위에서부터 순차적으로 실행되는것])
        CoroutineScope(Dispatchers.IO).launch {
            val lstTodo = roomDatabase.todoDao().getAllReadData() as ArrayList<TodoInfo> //전체데이터 가져옴
            //어뎁터쪽에 데이터 전달
            for (todoItem in lstTodo) {
                todoAdapter.addListItem(todoItem)
            }
            // UI Thread에서 처리
            runOnUiThread {
                todoAdapter.notifyDataSetChanged()
            }
        }


        // 플로팅 작성하기 버튼 클릭했을때 (AlerDialg로 팝업창 만들기)
        binding.btnWrite.setOnClickListener {
            //val binding = ListItemTodoBinding.inflate(LayoutInflater.from(parent.context), parent, false)  이해 참고용
            val bindingDialog = DialogEditBinding.inflate(LayoutInflater.from(binding.root.context), binding.root, false)

            AlertDialog.Builder(this)
                .setTitle("할일 기록하기")            //팝업제목
                .setView(bindingDialog.root)        //bindingDialog를 넣는것
                .setPositiveButton("작성완료", DialogInterface.OnClickListener { dialog, which ->
                    // 작성완료버튼 눌렀을때 동작
                    val todoItem = TodoInfo()   //todoItem에 사용자가 입력한값 넣음
                    todoItem.todoContent =  bindingDialog.etMemo.text.toString()                // bindingDialog.etMemo.text.toString() 를 사용해서 사용자가 입력한 값으로 가져오기
                    todoItem.todoDate = SimpleDateFormat("yyyy-MM-dd").format(Date())    //최신의 date값 넣어줌 (몇분몇초인지 HH:mm:ss)
                    todoAdapter.addListItem(todoItem)   // adepter쪽으로 리스트아이템이 전달

                    CoroutineScope(Dispatchers.IO).launch {     //코루틴 사용
                        roomDatabase.todoDao().insertTodoData(todoItem) // 데이터베이스에도 클래스데이터 삽입
                        runOnUiThread {
                            todoAdapter.notifyDataSetChanged()  // 리스트 새로고침
                        }
                    }
                })

                .setNegativeButton("취소", DialogInterface.OnClickListener { dialog, which ->
                    //취소버튼 눌렀을때 동작
                })
                .show() //마지막에 이걸 적어줘야 정상적으로 작동


        }
    }
}
MainActiviy.kt
//Room database의 기본틀
@Database(entities = [TodoInfo::class], version = 1)
abstract class TodoDatabase : RoomDatabase() {
    abstract fun todoDao() : TodoDao


    //companion object를 만들어서 getInstance라는 메소드만 호출하면 바로 불러올수있도록
    companion object {
        private var instance : TodoDatabase? = null
        @Synchronized
        fun getInstance(context : Context) : TodoDatabase? {
            if (instance == null) {
                synchronized((TodoDatabase :: class)) {
                    instance = Room.databaseBuilder(
                        context.applicationContext,
                        TodoDatabase :: class.java,
                        "todo-database"
                    ).build()
                }
            }
            return instance
        }
    }

}
todoDatabase.kt
import androidx.room.Dao
import androidx.room.Delete
import androidx.room.Insert
import androidx.room.Query
import androidx.room.Update
import com.example.todolist.model.TodoInfo


// 데이터베이스에 접근할수있는 객체를 만듬(Dao) - CRUD
@Dao
interface TodoDao {

    // database table에 삽입(추가)
    @Insert
    fun insertTodoData(todoInfo: TodoInfo)

    // database table에 기존에 존재하는 데이터를 수정
    @Update
    fun updateTodoDate(todoInfo: TodoInfo)

    // database table에 기존에 존재하는 데이터를 삭제
    @Delete
    fun deleteTodoDate(todoInfo: TodoInfo)

    // database table에 전체 데이터를 가져옴 (read-조회)
    @Query("SELECT * FROM TodoInfo ORDER BY todoDate") // 전체데이터 조회한다 TodoInfo테이블로부터
    fun getAllReadData(): List<TodoInfo>


}
TodoDao.kt
database를 사용해서 실제 데이터들을 추가,수정,삭제 할수있도록했다
동영상 서비스가 종료되어 해당 콘텐츠를 재생할 수 없습니다.
최종적으로 구현된 To do list앱이다!
작성,수정,삭제가 가능하고 앱을 나갔다가 들어와도 기존에 작성했던 데이터들이 그대로 남아있다!
아직까지 완벽하게 이해가 된것같지는 않아서 코드 많이 쳐보고 눈에 익혀야겠다!
'Android Project > Extras..' 카테고리의 다른 글
| [Android/Kotlin] 드로잉앱(1) (0) | 2023.12.13 |
|---|---|
| [Android/Kotlin] 퀴즈앱(1) (0) | 2023.12.10 |
| [Android/Kotlin] 계산기앱 (0) | 2023.12.10 |
| [Android/Kotlin] 나이 계산앱 (0) | 2023.12.10 |
| [Android/Kotlin] 간단한 Todo List 앱만들기 - 1. SplashActivity (0) | 2023.12.06 |


